0 of 12 steps0%
Back to guides
Tech & ComputersMedium

How to Install Arch Linux — Complete Walkthrough

Install the latest Arch Linux from scratch using the official guided installer (archinstall). Bootable USB, disk partitioning, desktop environment, first-boot essentials, and AUR setup — modern walkthrough, no legacy manual install steps.

admin
25 min
12 steps
5 views

Download the latest Arch Linux ISO

Step 1 of 12

Go to `archlinux.org/download` and grab the latest ISO from a mirror near you (the file is named `archlinux-version-x86_64.iso`, around 800 MB). The download page also has torrent and HTTPS mirrors — pick whichever is fastest for your location.

Verify the ISO signature (optional but recommended)

Step 2 of 12

On the download page you'll see a list of GPG signatures. Verify the download with: `gpg --keyserver-options auto-key-retrieve --verify archlinux-version-x86_64.iso.sig` — this catches any corruption or tampering. If you skip this and the install fails mysteriously, come back and run it.

Flash the ISO to a USB drive

Step 3 of 12

Open balenaEtcher (works on Linux/macOS/Windows) → click Flash from file → pick the ISO → pick your USB drive → click Flash. On Linux you can also use `sudo dd if=archlinux-version-x86_64.iso of=/dev/sdX bs=4M status=progress` — replace `/dev/sdX` with your USB device (NOT a partition). On Windows, Rufus works the same way. The USB will be wiped — back up anything you need first.

Boot from the USB

Step 4 of 12

Plug the USB into the target computer, then power it on. Mash the BIOS/UEFI boot-menu key during POST — it's usually `F12`, `F2`, `Del`, or `Esc` (the first boot screen tells you which). Pick the USB drive from the list, NOT the internal disk. You'll see a black screen with white text — that's the Arch live environment. It drops you straight to a root shell prompt.

Connect to the internet

Step 5 of 12

If you're on ethernet, you're already online — `ping archlinux.org` to confirm. If you're on WiFi, run `iwctl` → at the prompt type `station wlan0 scan` → `station wlan0 get-networks` → `station wlan0 connect "YourNetworkName"` → enter the password → `exit`. Then verify with `ping -c 3 archlinux.org`. Most laptops have only one wireless interface, but on desktops you might need `device list` inside `iwctl` to find yours.

Update the system clock

Step 6 of 12

Run `timedatectl set-ntp true` to enable network time sync. This matters because the installer uses the clock to mark filesystem creation dates — a wildly wrong clock can confuse some downstream tools. Verify with `timedatectl status` — under `System clock synchronized` you should see `yes`.

Launch the guided installer

Step 7 of 12

Launch the guided installer

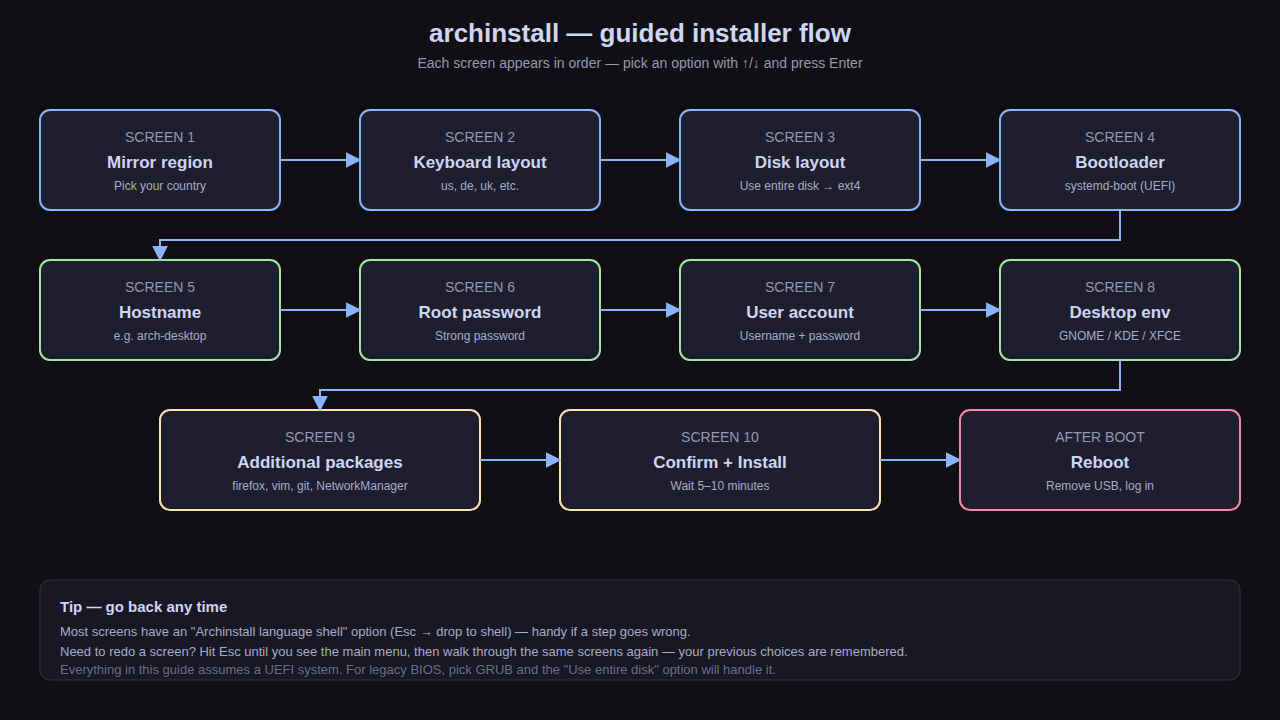
Type `archinstall` and press Enter. A blue-and-grey TUI menu opens — every screen is navigated with ↑/↓/Enter and Space to toggle. The installer remembers your choices between screens, so don't panic if you pick the wrong thing — you can go back with Esc. The screens you'll see, in order, are shown in the diagram below.

Configure the installer — locale, disk, accounts

Step 8 of 12

Walk through these screens: (1) Archinstall language — pick English. (2) Mirror region — pick your country for fastest downloads. (3) Keyboard layout — `us` for most people, otherwise find your layout in the list. (4) Disk layout — choose `Use a best-effort default layout` then pick your disk (it lists `/dev/sda`, `/dev/nvme0n1`, etc.) and ext4 filesystem. (5) Bootloader — `systemd-boot` for UEFI, `grub` for legacy BIOS. (6) Hostname — e.g. `arch-desktop`. (7) Root password — pick something strong, you won't use it often. (8) User account — your name, username, and a separate password (this is what you'll log in with).

Pick a desktop environment and extra packages

Step 9 of 12

On the `Desktop profile` screen pick one: `gnome`, `kde`, `xfce4`, `cinnamon`, `mate`, `i3`, `sway`, or None (CLI-only). For most beginners, GNOME or KDE are easiest — they boot into a familiar desktop with WiFi, browser, and settings ready. Then on `Additional packages` type the ones you want pre-installed: at minimum `firefox vim git networkmanager network-manager-applet`. The bluetooth and audio packages are optional but usually worth adding too: `pulseaudio pavucontrol bluez bluez-utils`.

Confirm and install

Step 10 of 12

Hit `Install` and wait. The installer partitions the disk, downloads ~800 packages, and writes the bootloader — usually 5–10 minutes on a fast connection. Watch the progress bar. If it errors out, read the message: most failures are network (re-run), mirror (pick a closer one), or disk-related (check you picked the right disk). When it finishes you'll see a green checkmark and `chroot into installation` becomes available — you can use it to fix things, but for a normal install you don't need to.

Reboot into your new system

Step 11 of 12

Type `exit` then `reboot`. Pull the USB drive out before the BIOS screen comes back (otherwise you'll boot back into the installer). Your new Arch desktop — or login prompt if you picked no DE — should appear. Log in with the username and password you set in step 8. First boot is usually slower than usual — that's normal, systemd is starting everything for the first time.

First-boot essentials: update, enable services, install yay

Step 12 of 12

Open a terminal and run: `sudo pacman -Syu` — this updates every package to the latest version (Arch is rolling release, so even a fresh install picks up newer packages than the ISO had). Then enable the services you need: `sudo systemctl enable --now NetworkManager` (if you didn't add it to additional packages), `sudo systemctl enable --now bluetooth` if you want bluetooth. To get access to the AUR (Arch User Repository, where most unofficial packages live), install yay: `sudo pacman -S --needed git base-devel && git clone https://aur.archlinux.org/yay.git && cd yay && makepkg -si` — then `cd .. && rm -rf yay`. After that, `yay -S package-name` works just like pacman for AUR packages.